Desktop toy – Snow

This article was posted on last Christmas. Now I move this to my new home.

It’s very hard to see snow here, but we can create a desktop toy to simulate snowing on your screen. If you run this desktop toy, you will see snow falling from top of your screen. The compiled version can be downloaded here

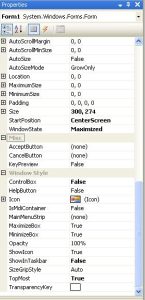
  • Simply create a WinForm application in Visual Studio 2008,and change the Form properties as following picture shows. If you don’t have Visual Studio 2008, you also can download Visual Studio Express for free

  • Dump the following code and run it.
using System;
using System.Collections.Generic;
using System.Drawing;
using System.Drawing.Drawing2D;
using System.Drawing.Imaging;
using System.Runtime.InteropServices;
using System.Windows.Forms;

namespace Snow
{
    public partial class Form1 : Form
    {
        private Bitmap m_Snow;
        private static readonly Random rand = new Random();
        private readonly List SnowFlakes = new List();
        private int Tick = 0;
        private class SnowFlake
        {
            public float Rotation;
            public float RotVelocity;
            public float Scale;
            public float X;
            public float XVelocity;
            public float Y;
            public float YVelocity;
        }

        Image screenImage;

        private void Form1_Load(object sender, EventArgs e)
        {
            ////
            screenImage = new Bitmap(Screen.PrimaryScreen.Bounds.Width, Screen.PrimaryScreen.Bounds.Height);
        }

        private void SetBackground(Image img)
        {
            try
            {
                Bitmap bitmap = (Bitmap)img;
                if (bitmap.PixelFormat != PixelFormat.Format32bppArgb)
                {
                    throw new ApplicationException();
                }
                IntPtr hObject = IntPtr.Zero;
                IntPtr zero = IntPtr.Zero;
                IntPtr hDC = Win32.GetDC(IntPtr.Zero);
                IntPtr ptr2 = Win32.CreateCompatibleDC(hDC);
                try
                {
                    hObject = bitmap.GetHbitmap(Color.FromArgb(0));
                    zero = Win32.SelectObject(ptr2, hObject);
                    Win32.Size size2 = new Win32.Size(bitmap.Width, bitmap.Height);
                    Win32.Size psize = size2;
                    Win32.Point point3 = new Win32.Point(0, 0);
                    Win32.Point pprSrc = point3;
                    point3 = new Win32.Point(base.Left, base.Top);
                    Win32.Point pptDst = point3;
                    Win32.BLENDFUNCTION pblend = new Win32.BLENDFUNCTION();
                    pblend.BlendOp = 0;
                    pblend.BlendFlags = 0;
                    pblend.SourceConstantAlpha = 0xff;
                    pblend.AlphaFormat = 1;
                    Win32.UpdateLayeredWindow(this.Handle, hDC, ref pptDst, ref psize, ptr2, ref pprSrc, 0, ref pblend, 2);
                }
                catch (Exception exception1)
                {
                    Exception exception = exception1;
                    throw exception;
                }
                finally
                {
                    Win32.ReleaseDC(IntPtr.Zero, hDC);
                    if (hObject != IntPtr.Zero)
                    {
                        Win32.SelectObject(ptr2, zero);
                        Win32.DeleteObject(hObject);
                    }
                    Win32.DeleteDC(ptr2);
                }
            }
            catch (Exception e)
            {
                MessageBox.Show(e.Message);
            }
        }
        protected override System.Windows.Forms.CreateParams CreateParams
        {
            get
            {
                System.Windows.Forms.CreateParams createParams = base.CreateParams;
                createParams.ExStyle |= 0x80000;
                return createParams;
            }
        }
        private Bitmap Snow
        {
            get
            {
                if (m_Snow == null)
                {
                    m_Snow = new Bitmap(32, 32);
                    using (Graphics g = Graphics.FromImage(m_Snow))
                    {
                        g.SmoothingMode = SmoothingMode.AntiAlias;
                        g.Clear(Color.Transparent);
                        g.TranslateTransform(16, 16, MatrixOrder.Append);
                        Color black = Color.FromArgb(1, 1, 1);
                        Color white = Color.FromArgb(255, 255, 255);
                        DrawSnow(g, new SolidBrush(black), new Pen(black, 3f));
                        DrawSnow(g, new SolidBrush(white), new Pen(white, 2f));
                        g.Save();
                    }
                }
                return m_Snow;
            }
        }
        public Form1()
        {
            InitializeComponent();
            SetStyle(ControlStyles.UserPaint | ControlStyles.AllPaintingInWmPaint | ControlStyles.DoubleBuffer, true);
        }
        private void OnTick(object sender, EventArgs args)
        {
            Tick++;
            //new snow flake
            if (Tick % 5 == 0 && rand.NextDouble() < 0.30)
            {
                SnowFlake s = new SnowFlake();
                s.X = rand.Next(-20, this.Width + 20);
                s.Y = 0f;
                s.XVelocity = (float)(rand.NextDouble() - 0.5f) * 2f;
                s.YVelocity = (float)(rand.NextDouble() * 3) + 1f;
                s.Rotation = rand.Next(0, 359);
                s.RotVelocity = rand.Next(-3, 3) * 2;
                if (s.RotVelocity == 0)
                {
                    s.RotVelocity = 3;
                }
                s.Scale = (float)(rand.NextDouble() / 2) + 0.75f;
                SnowFlakes.Add(s);
            }
             //To draw snowflake
            Graphics g = Graphics.FromImage(screenImage);
            g.Clear(Color.Transparent);
            g.SmoothingMode = SmoothingMode.HighSpeed;

            for (int i = 0; i < SnowFlakes.Count; i++)             {                 SnowFlake s = SnowFlakes[i];                 s.X += s.XVelocity;                 s.Y += s.YVelocity;                 s.Rotation += s.RotVelocity;                 s.XVelocity += ((float)rand.NextDouble() - 0.5f) * 0.7f;                 s.XVelocity = Math.Max(s.XVelocity, -2f);                 s.XVelocity = Math.Min(s.XVelocity, +2f);                 if (s.Y > this.Height)
                {
                    SnowFlakes.RemoveAt(i);
                }
                else
                {
                    g.ResetTransform();
                    g.TranslateTransform(-16, -16, MatrixOrder.Append); //pan
                    g.ScaleTransform(s.Scale, s.Scale, MatrixOrder.Append); //scale
                    g.RotateTransform(s.Rotation, MatrixOrder.Append); //rotate
                    g.TranslateTransform(s.X, s.Y, MatrixOrder.Append); //pan
                    g.DrawImage(Snow, 0, 0); //draw
                    ////g.Dispose();
                }
            }
            g.Dispose();
            SetBackground(screenImage);
        }

        private static void DrawSnow(Graphics g, Brush b, Pen p)
        {
            const int a = 6;
            const int a2 = a + 2;
            const int r = 2;
            g.DrawLine(p, -a, -a, +a, +a);
            g.DrawLine(p, -a, +a, +a, -a);
            g.DrawLine(p, -a2, 0, +a2, 0);
            g.DrawLine(p, 0, -a2, 0, +a2);
            g.FillEllipse(b, -r, -r, r * 2, r * 2);
        }
    }
}
Create your personalized web signature

Some website, eg http://www.danasoft.com/, provides customized signature that shows the ip address, the ISP, the OS and browser. You also can DIY your own with your style.

This article is for anyone who has basic network knowledge and is interested in DIY and it will guide you from start to finish so you get the full picture.

  1. Apply a free web hosting with PHP supported
  2. Download GeoIP.dat, geoip.inc and client.inc to your local drive
  3. Create and save ip.php as shown below
  4. Upload ip.php, GeoIP.dat, geoip.inc and client.inc to your new web space
  5. Open your browser and type “http://somespace.somespace/ip.php


Decorate your .Net WinForm application in a peculiar way

This article actually was written in last Christmas, now I just re-post in my new home.

Every programmer wants his application GUI to stand out, and so do I. A new idea came into my mind. I would like to add a Christmas hat on the top left corner of my WinForm application. This is not only simple but also not adding too much work load.

.Net application skin could be the first solution for most programmer. But it seems not worth it, because a huge skin library has to be installed just for this simple function. Furthermore, commercial skin library is not free at all.

I have to go back google again. Someone mention that it can override WndProc and in WM_NCPAINT, you have to draw your own title bar, and write function for each button. It seems a lot of work to do.Finally, I invent this peculiar way.

1. Create a transparent Form,
2. Put only a hat inside
3. Let it stay on the top left corner

private void Form1_LocationChanged(object sender, System.EventArgs e)
{
    hat.Location = new Point(this.Location.X-30,this.Location.Y-10);
}

private void Form1_Activated(object sender, System.EventArgs e)
{
    if(!hat.TopMost)
    {
        hat.TopMost = true;
        hat.BringToFront();
    }
}

private void Form1_Deactivate(object sender, System.EventArgs e)
{
    if(hat.TopMost)
        hat.TopMost = false;
}

ASP.net dynamically generate MS Word document (3)

If you are following the previous two articles, you will see a “Word” document in your frond. However, you may find some glitches in this document and there is a hidden box on top of the document. This is because ASP.Net generates “__VIEWSTATE” hidden view to track each page status.

We don’t want this field to be displayed as this should be a final “Word” document without any attached strings. To get rid of this, we have to override Render method.

protected override void Render(HtmlTextWriter writer)
{
  StringBuilder sb = new StringBuilder();
  HtmlTextWriter htw = new HtmlTextWriter(new StringWriter(sb));
  base.Render(htw);
  sb = sb.Replace(""
        ,string.Empty);
  writer.Write(sb.ToString());
}

You should have a complete “Word” document right now.

ASP.net dynamically generate MS Word document (2)

MS Word treat this generated “Word” document differently

When clicking download generated document, IE will pop up “File Download” dialog as expected. However when opening the downloaded document, MS Word will be in “Web Layout View” instead of “Print Layout View”.

Let MS Word “thinks” this is true word document and open in “Print Layout View” with zoom “90%

Replace original Visual Studio automatically generated .aspx header with the following code


OK! Now when MS Word opens this html style Word document, it more likely opens a real Word document.

Another issue comes up that MS Word is so smart, and it automatically breaks the page.

If you want to break the page on a certain position, you can insert the following code into your html style Word document.

Previous page

Next page

ASP.net dynamically generate MS Word document (1)

Currently I am using ASP.net and working on a web project, which requires dynamically generate Microsoft Word submission document. The generated document must be specific format, and include page number, last print date, company logo, etc.

At first, I was thinking of using COM (Component Object Model). Because MS Word can comfortably work with .Net framework, .Net provide easy runtime callable wrapper. But it requires MS Word to be installed at server side, and it may slow down web server running. I have to give up.

And then I was looking for 3rd party .Net library generate MS Word. It’s not a cheap solution either.

After google, finally I found out that MS Word is compatible with HTML file format. As long as you rename .htm to .doc. MS Word can easily open. What I can do is to create a html template and then filled out the dynamic sections and response back to end user.

Here is the code snap shot:

protected void Page_Load(object sender, EventArgs e)
{
  if (this.Request["projectID"] != null)
  {
    //fill dynamic section
    this.catlist.DataBind();
    Response.Clear();
    //add word document header to response
    Response.AddHeader("content-disposition", "attachment;filename=Submission.doc");
    Response.Charset = "utf-8";
    Response.ContentType = "application/ms-word";
    //flush out whole page to word document
    System.IO.StringWriter stringWrite = new System.IO.StringWriter();
    System.Web.UI.HtmlTextWriter htmlWrite = new HtmlTextWriter(stringWrite);
    this.Page.RenderControl(htmlWrite);
    Response.Write(stringWrite.ToString());
    Response.Flush();
    Response.End();
  }
}

I will keep posting the problem that I met and the solution in the next few posts.

Android on my SuperPad

Recently, I bought a SuperPad from eBay for my kid learning, which is running Google Android 2.1.

It’s pretty cool because I can develop my own educational application for my kid.  As I haven’t been playing Java for a long time, I have to refresh my memory, and it will slow down the process a little bit.

Download Eclipse IDE, Android simulator, setup development environment… Finally I have my HelloWorld running!!!!!! It’s so excited to see these two words appearing in my new SuperPad screen.

After few days’ trial, I have two applications ready for my kid Kids Draw and Spot the Difference.