CeBIT Australia at Sydney Darling Harbour

CeBIT is the world’s largest and most international computer expo, and is a traditional computer show held every year. As it grows quickly, CeBIT Australia becomes bigger and bigger. Lots of IT equipment suppliers join this trade show, eg DELL, Samsung, Hitachi, D-Link, etc. This year, CeBIT 2011 starts yesterday and is held for 3 days.

Samsung huge LCD display and show stand

D-Link and its Ethernet router

NEC and DELL

Motorola

Pronto software

CSRIO is displaying their 3D detect system

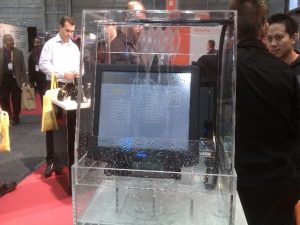
Waterproof LCD monitor

Other stands


The only disappointing is  no world-wide largest IT manufacture, eg IBM, Intel, NVidia. I didn’t see many emerging technologies.

Unlock Huawei E585 WCDMA 3G modem

My colleague brought two PocketWifi 3G Modems to my desk and asked me to see if possible to unlock them. I found out that they are actually E585 WCDMA 3G Modem OEM by Huawei. It will normally cost you $25 each to unlock if you ring up the customer service.

After few hours attempting, I finally found a way to unlock them for free without any cost. If you like DIY, here are the outlines to share.

Preparation: a USB Cable, locked SIM card, and internet access

  • Connect 3G Modem to PC with USB Cable and install windows modem driver (ensure not WIFI connection)
  • Download RevSkills from http://psas.revskills.de/?q=node/6 and install on your computer
  • Run RevSkill from your desktop and select “QC+AT-Cmd”

  • Select correct 3G modem COM port from the list and Baud Rate

  • Go to DIAG tab, and click “Send”, if success, you will see your 3G Modem Version information comes out

  • Select “Save NVItems to file” and click “Lets go”. It will pop a window to ask you where to save the NVItems

  • Use Notepad to open the saved file and search “PST”. The number behind “PST” is the unlock code. After you enter this unlock code, your device is free to use any WCDMA 3G network.


A funny joke application makes your window dance

These days I am so busy with work, and haven’t got time to write anything.

This is a funny joke application I wrote long time back. It will make your front window dance. If you press any key, this application will exit.

You can download here
This is the code, in case if you want to make your own.

#include "stdafx.h"
#include "math.h"
#include "windows.h"
#include "time.h"
#include "conio.h"

int _tmain(int argc, _TCHAR* argv[])
{
	RECT rect;
	int offset;
	while(!kbhit())
	{
		HWND hWnd = GetForegroundWindow();
		GetWindowRect(hWnd,&rect);
		offset = sin((float)rand())*10;
		rect.left += offset;
		rect.bottom += offset;
		rect.right += offset;
		rect.top += offset;
		MoveWindow(hWnd,rect.left,rect.top,rect.right-rect.left,rect.bottom-rect.top,true);
		Sleep(20);
	}
	return 0;
}

Install APK into new HTC smart phone

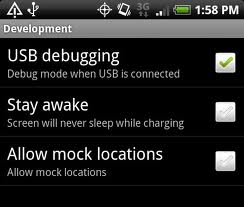
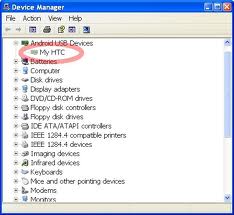
Today, my colleague asked me how to install downloaded *.apk into his new HTC phone. As HTC doesn’t come with file manager, you have to enable USB debug mode. Here are the steps to install

  • Enable HTC USB Debug mode

  • You will see the application is in your Android smart phone

Web (HTTP) based remote PC monitor

VNC and Microsoft RemoteDesktop both provide remote control software which lets you see and interact with desktop applications across any network, however either software requires to install a client application on control side.

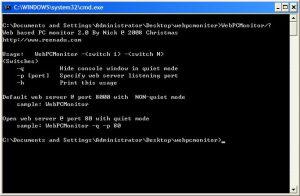
Here I have developed a small tool, WebPCMonitor. It will allow you to see and interact with your own PC desktop through HTTP protocol. It means that on client side, you don’t need install any 3rd party tool but a internet browser. Simply type your remote PC’s name or IP address, and you will see your PC’s desktop. You even can remote control your PC through PDA or SmartPhone (eg iPhone, iPad, Android, etc) as long as you have internet access. This tool works with Win98, Win2000, WinXP, and Win7.

You can download here.

Run the application, and open your browser and type “http://localhost:8000“. If you know your PC’s IP address, you can remote access through PDA or SmartPhone by typing “http://address:8000

Create customized .Net Component – CircularListBox in C#

This post originated from my previous question. In previous question, I was asking how to create a circular list box control. A list box, if scroll down to the last element and continue scroll down, it will appear first element; if scroll up to the first element and keep scroll up, it will appear last element. It looks like IPhone alarm setting function. Here is my solution.

public class CircularListBox : System.Windows.Forms.ListBox
{
    private System.ComponentModel.Container components = null;
    const int WM_VSCROLL = 0x0115;
    const int WM_KEYDOWN = 0x0100;

    const int SB_LINEUP = 0x0000;
    const int SB_LINEDOWN = 0x0001;

    const int VK_DOWN = 0x0028;
    const int VK_UP = 0x0026;
    const int VK_NEXT = 0x0022;
    const int VK_PRIOR = 0x0021;

    public CircularListBox()
    {
        // This call is required by the Windows.Forms Form Designer.
        InitializeComponent();

        // TODO: Add any initialization after the InitializeComponent call

    }

    ///  
    /// Clean up any resources being used.
    /// 
    protected override void Dispose(bool disposing)
    {
        if (disposing)
        {
            if (components != null)
            {
                components.Dispose();
            }
        }
        base.Dispose(disposing);
    }

    #region Component Designer generated code
    ///  
    /// Required method for Designer support - do not modify 
    /// the contents of this method with the code editor.
    /// 
    private void InitializeComponent()
    {
        components = new System.ComponentModel.Container();
    }
    #endregion
    protected int offset = 0;

    public new int TopIndex
    {
        get { return (this.Items.Count + offset + base.TopIndex) % this.Items.Count; }
        set
        {
            if (value > this.Items.Count - 1)
                return;
            Message m = new Message();
            m.Msg = WM_KEYDOWN;
            m.WParam = (System.IntPtr)VK_DOWN;
            while (value != this.TopIndex)
                WndProc(ref m);
        }
    }

    protected override void WndProc(ref Message m)
    {
        if (m.Msg == WM_VSCROLL || m.Msg == WM_KEYDOWN)
        {
            if (this.SelectedIndex == -1)
                this.SelectedIndex = 0;

            switch ((int)m.WParam)
            {
                case VK_PRIOR:
                case VK_UP:
                case SB_LINEUP:
                    if (this.SelectedIndex == 0)
                    {
                        offset = (this.Items.Count + offset - 1) % this.Items.Count;
                        this.Items.Insert(0, this.Items[this.Items.Count - 1]);
                        this.Items.RemoveAt(this.Items.Count - 1);
                        this.SelectedIndex = 0;
                    }
                    else
                    {
                        this.SelectedIndex--;
                    }
                    break;
                case VK_DOWN:
                case SB_LINEDOWN:
                case VK_NEXT:
                    if (this.SelectedIndex == this.Items.Count - 1)
                    {
                        offset = ++offset % this.Items.Count;
                        this.Items.Add(this.Items[0]);
                        this.Items.RemoveAt(0);
                        this.SelectedIndex = this.Items.Count - 1;
                    }
                    else
                    {
                        this.SelectedIndex++;
                    }
                    break;
                default:
                    base.WndProc(ref m);
                    break;
            }
        }
        else
            base.WndProc(ref m);
    }
}

Desktop toy – Snow

This article was posted on last Christmas. Now I move this to my new home.

It’s very hard to see snow here, but we can create a desktop toy to simulate snowing on your screen. If you run this desktop toy, you will see snow falling from top of your screen. The compiled version can be downloaded here

  • Simply create a WinForm application in Visual Studio 2008,and change the Form properties as following picture shows. If you don’t have Visual Studio 2008, you also can download Visual Studio Express for free
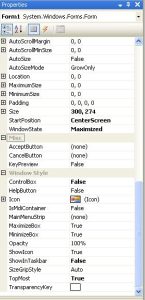
  • Dump the following code and run it.
using System;
using System.Collections.Generic;
using System.Drawing;
using System.Drawing.Drawing2D;
using System.Drawing.Imaging;
using System.Runtime.InteropServices;
using System.Windows.Forms;

namespace Snow
{
    public partial class Form1 : Form
    {
        private Bitmap m_Snow;
        private static readonly Random rand = new Random();
        private readonly List SnowFlakes = new List();
        private int Tick = 0;
        private class SnowFlake
        {
            public float Rotation;
            public float RotVelocity;
            public float Scale;
            public float X;
            public float XVelocity;
            public float Y;
            public float YVelocity;
        }

        Image screenImage;

        private void Form1_Load(object sender, EventArgs e)
        {
            ////
            screenImage = new Bitmap(Screen.PrimaryScreen.Bounds.Width, Screen.PrimaryScreen.Bounds.Height);
        }

        private void SetBackground(Image img)
        {
            try
            {
                Bitmap bitmap = (Bitmap)img;
                if (bitmap.PixelFormat != PixelFormat.Format32bppArgb)
                {
                    throw new ApplicationException();
                }
                IntPtr hObject = IntPtr.Zero;
                IntPtr zero = IntPtr.Zero;
                IntPtr hDC = Win32.GetDC(IntPtr.Zero);
                IntPtr ptr2 = Win32.CreateCompatibleDC(hDC);
                try
                {
                    hObject = bitmap.GetHbitmap(Color.FromArgb(0));
                    zero = Win32.SelectObject(ptr2, hObject);
                    Win32.Size size2 = new Win32.Size(bitmap.Width, bitmap.Height);
                    Win32.Size psize = size2;
                    Win32.Point point3 = new Win32.Point(0, 0);
                    Win32.Point pprSrc = point3;
                    point3 = new Win32.Point(base.Left, base.Top);
                    Win32.Point pptDst = point3;
                    Win32.BLENDFUNCTION pblend = new Win32.BLENDFUNCTION();
                    pblend.BlendOp = 0;
                    pblend.BlendFlags = 0;
                    pblend.SourceConstantAlpha = 0xff;
                    pblend.AlphaFormat = 1;
                    Win32.UpdateLayeredWindow(this.Handle, hDC, ref pptDst, ref psize, ptr2, ref pprSrc, 0, ref pblend, 2);
                }
                catch (Exception exception1)
                {
                    Exception exception = exception1;
                    throw exception;
                }
                finally
                {
                    Win32.ReleaseDC(IntPtr.Zero, hDC);
                    if (hObject != IntPtr.Zero)
                    {
                        Win32.SelectObject(ptr2, zero);
                        Win32.DeleteObject(hObject);
                    }
                    Win32.DeleteDC(ptr2);
                }
            }
            catch (Exception e)
            {
                MessageBox.Show(e.Message);
            }
        }
        protected override System.Windows.Forms.CreateParams CreateParams
        {
            get
            {
                System.Windows.Forms.CreateParams createParams = base.CreateParams;
                createParams.ExStyle |= 0x80000;
                return createParams;
            }
        }
        private Bitmap Snow
        {
            get
            {
                if (m_Snow == null)
                {
                    m_Snow = new Bitmap(32, 32);
                    using (Graphics g = Graphics.FromImage(m_Snow))
                    {
                        g.SmoothingMode = SmoothingMode.AntiAlias;
                        g.Clear(Color.Transparent);
                        g.TranslateTransform(16, 16, MatrixOrder.Append);
                        Color black = Color.FromArgb(1, 1, 1);
                        Color white = Color.FromArgb(255, 255, 255);
                        DrawSnow(g, new SolidBrush(black), new Pen(black, 3f));
                        DrawSnow(g, new SolidBrush(white), new Pen(white, 2f));
                        g.Save();
                    }
                }
                return m_Snow;
            }
        }
        public Form1()
        {
            InitializeComponent();
            SetStyle(ControlStyles.UserPaint | ControlStyles.AllPaintingInWmPaint | ControlStyles.DoubleBuffer, true);
        }
        private void OnTick(object sender, EventArgs args)
        {
            Tick++;
            //new snow flake
            if (Tick % 5 == 0 && rand.NextDouble() < 0.30)
            {
                SnowFlake s = new SnowFlake();
                s.X = rand.Next(-20, this.Width + 20);
                s.Y = 0f;
                s.XVelocity = (float)(rand.NextDouble() - 0.5f) * 2f;
                s.YVelocity = (float)(rand.NextDouble() * 3) + 1f;
                s.Rotation = rand.Next(0, 359);
                s.RotVelocity = rand.Next(-3, 3) * 2;
                if (s.RotVelocity == 0)
                {
                    s.RotVelocity = 3;
                }
                s.Scale = (float)(rand.NextDouble() / 2) + 0.75f;
                SnowFlakes.Add(s);
            }
             //To draw snowflake
            Graphics g = Graphics.FromImage(screenImage);
            g.Clear(Color.Transparent);
            g.SmoothingMode = SmoothingMode.HighSpeed;

            for (int i = 0; i < SnowFlakes.Count; i++)             {                 SnowFlake s = SnowFlakes[i];                 s.X += s.XVelocity;                 s.Y += s.YVelocity;                 s.Rotation += s.RotVelocity;                 s.XVelocity += ((float)rand.NextDouble() - 0.5f) * 0.7f;                 s.XVelocity = Math.Max(s.XVelocity, -2f);                 s.XVelocity = Math.Min(s.XVelocity, +2f);                 if (s.Y > this.Height)
                {
                    SnowFlakes.RemoveAt(i);
                }
                else
                {
                    g.ResetTransform();
                    g.TranslateTransform(-16, -16, MatrixOrder.Append); //pan
                    g.ScaleTransform(s.Scale, s.Scale, MatrixOrder.Append); //scale
                    g.RotateTransform(s.Rotation, MatrixOrder.Append); //rotate
                    g.TranslateTransform(s.X, s.Y, MatrixOrder.Append); //pan
                    g.DrawImage(Snow, 0, 0); //draw
                    ////g.Dispose();
                }
            }
            g.Dispose();
            SetBackground(screenImage);
        }

        private static void DrawSnow(Graphics g, Brush b, Pen p)
        {
            const int a = 6;
            const int a2 = a + 2;
            const int r = 2;
            g.DrawLine(p, -a, -a, +a, +a);
            g.DrawLine(p, -a, +a, +a, -a);
            g.DrawLine(p, -a2, 0, +a2, 0);
            g.DrawLine(p, 0, -a2, 0, +a2);
            g.FillEllipse(b, -r, -r, r * 2, r * 2);
        }
    }
}
Create your personalized web signature

Some website, eg http://www.danasoft.com/, provides customized signature that shows the ip address, the ISP, the OS and browser. You also can DIY your own with your style.

This article is for anyone who has basic network knowledge and is interested in DIY and it will guide you from start to finish so you get the full picture.

  1. Apply a free web hosting with PHP supported
  2. Download GeoIP.dat, geoip.inc and client.inc to your local drive
  3. Create and save ip.php as shown below
  4. Upload ip.php, GeoIP.dat, geoip.inc and client.inc to your new web space
  5. Open your browser and type “http://somespace.somespace/ip.php


Decorate your .Net WinForm application in a peculiar way

This article actually was written in last Christmas, now I just re-post in my new home.

Every programmer wants his application GUI to stand out, and so do I. A new idea came into my mind. I would like to add a Christmas hat on the top left corner of my WinForm application. This is not only simple but also not adding too much work load.

.Net application skin could be the first solution for most programmer. But it seems not worth it, because a huge skin library has to be installed just for this simple function. Furthermore, commercial skin library is not free at all.

I have to go back google again. Someone mention that it can override WndProc and in WM_NCPAINT, you have to draw your own title bar, and write function for each button. It seems a lot of work to do.Finally, I invent this peculiar way.

1. Create a transparent Form,
2. Put only a hat inside
3. Let it stay on the top left corner

private void Form1_LocationChanged(object sender, System.EventArgs e)
{
    hat.Location = new Point(this.Location.X-30,this.Location.Y-10);
}

private void Form1_Activated(object sender, System.EventArgs e)
{
    if(!hat.TopMost)
    {
        hat.TopMost = true;
        hat.BringToFront();
    }
}

private void Form1_Deactivate(object sender, System.EventArgs e)
{
    if(hat.TopMost)
        hat.TopMost = false;
}

ASP.net dynamically generate MS Word document (3)

If you are following the previous two articles, you will see a “Word” document in your frond. However, you may find some glitches in this document and there is a hidden box on top of the document. This is because ASP.Net generates “__VIEWSTATE” hidden view to track each page status.

We don’t want this field to be displayed as this should be a final “Word” document without any attached strings. To get rid of this, we have to override Render method.

protected override void Render(HtmlTextWriter writer)
{
  StringBuilder sb = new StringBuilder();
  HtmlTextWriter htw = new HtmlTextWriter(new StringWriter(sb));
  base.Render(htw);
  sb = sb.Replace(""
        ,string.Empty);
  writer.Write(sb.ToString());
}

You should have a complete “Word” document right now.